

- 1 Harborとは?
- 2 検証環境
- 3 事前準備
- 4 ストレージ(Local Path Provisioner)のインストール
- 5 MetalLBのインストール
- 6 イングレスコントローラのインストール
- 7 証明書の作成
- 8 PC側の作業
- 9 Harborのインストール
- 10 Harbor管理画面へのログイン
- Z 参考図書

1 Harborとは?
Harborは、コンテナイメージを保存・管理するためのコンテナレジストリです。Docker Hubのような公開レジストリとは異なり、組織内に専用のレジストリを構築できるため、本番環境で使用するコンテナイメージを安全に一元管理できます。また、イメージの脆弱性スキャン、アクセス制御、イメージ署名、レプリケーションなど、コンテナを安全に運用するための機能を標準で提供しています。
2 検証環境
2.1 ネットワーク構成
検証環境は、VMware Workstation Pro上に構築した3台の仮想マシンでKubernetesクラスタを構成しています。各仮想マシンはブリッジ接続により、PCと同じネットワーク(192.168.1.0/24)に接続されています。
一方、10.244.0.0/16 は、CalicoのCNIプラグインによってクラスタ内に作成されるPodネットワークです。各Podにはこのアドレス帯からIPアドレスが割り当てられ、異なるノード上のPod同士が相互に通信する際に使用されます。Calicoは各ノードに経路を設定することで、Pod間通信を透過的に実現しています。
+--- control ---+    +--- worker1 ---+   +--- worker2 ---+
|AlmaLinux 10.2 |    |AlmaLinux 10.2 |   |AlmaLinux 10.2 |
|               |    |               |   |               |
|      Pod      |    |      Pod      |   |      Pod      |
|       |       |    |       |       |   |       |       |
| 10.244.x.0/24 |    | 10.244.y.0/24 |   | 10.244.z.0/24 |
| ------------- |    | ------------- |   | ------------- |
|               |    |               |   |               |
+-------+-------+    +-------+-------+   +-------+-------+
        |.19                 |.20                |.22
        |                    |                   |
        |   192.168.1.0/24   |                   |
+--------------------------------------------------------+
|        VMware Workstation Pro(Bridged networking)    |
+--------------------------------------------------------+
                             |
                    +---------------+
                    |               |
                    |       PC      |
                    |               |
                    +---------------+
それぞれの役割は以下のとおりです。
1台をコントロールノード、2台をワーカーノードとして使用します。
| ホスト名 | 名称 | 役割 |
|---|---|---|
| control | コントロールノード | クラスタ(control、worker1、worker2)の状態を管理し、Pod をどのノードで実行するかを決定するノード |
| worker1 | ワーカーノード | Pod を実行するノード |
| worker2 | ワーカーノード | Pod を実行するノード |
2.2 ソフトウェアのバージョン
各ノードのAlmaLinuxバージョンは以下のとおりです。
[root@control ~]# cat /etc/redhat-release
AlmaLinux release 10.2 (Lavender Lion)
各ノードのカーネルバージョンは以下のとおりです。
[root@control ~]# uname -r
6.12.0-211.7.3.el10_2.x86_64
Kubernetesのバージョンは以下のとおりです。
[root@control ~]# kubectl version
Client Version: v1.36.2
Kustomize Version: v5.8.1
Server Version: v1.36.2
2.3 ノードのリソース
各ノードには4GBのメモリを割り当てています。
[root@control ~]#  free -h
               total        used        free      shared  buff/cache   available
Mem:           3.6Gi       1.3Gi       1.0Gi       5.8Mi       1.5Gi       2.3Gi
Swap:             0B          0B          0B
各ノードは 4コアのCPU(4 vCPU) を搭載しています。
[root@control ~]# lscpu -xe
CPU NODE SOCKET CORE L1d:L1i:L2:L3 ONLINE
  0    0      0    0 0:0:0:0          yes
  1    0      1    1 1:1:1:1          yes
  2    0      2    2 2:2:2:2          yes
  3    0      3    3 3:3:3:3          yes
lscpuコマンドの詳しい使い方は、以下のページをご覧ください。
hana-shin.hatenablog.com
3 事前準備
本検証ではCNI(Container Network Interface)にCalicoを使用しており、ノード間のPod通信にはIPIPカプセル化方式(tunl0インターフェース)を使用しています。firewalldを有効にした環境では、Calicoが使用するトンネルインターフェースやPodネットワークに対する通信がfirewalldによって許可されていない場合、Pod間通信が正常に行えず、Harborなどのアプリケーションが正常に動作しないことがあります。そのため、この後の手順(MetalLB、Harborのインストール)を正常に進めるため、事前に以下の設定を行います。3章の設定は全てのノード(コントロールノード、ワーカノード)で実施します。
(1) tunl0 の状態確認
tunl0が現在どのゾーンに属しているか確認します。no zoneと表示された場合、以降の設定が必要です。
[root@control ~]# firewall-cmd --get-zone-of-interface=tunl0
no zone
firewall-cmdコマンドの詳しい使い方は、以下のページをご覧ください。
hana-shin.hatenablog.com
(2) trustedゾーンへの追加
firewalldのtrustedゾーンは、そのゾーンに属する通信を許可する、最も信頼度の高いゾーンです。今回は、Calicoが使用するトンネルインターフェース(tunl0)と、Podネットワーク(10.244.0.0/16)からの通信を許可するため、これらをtrustedゾーンへ追加します。
tunl0インターフェースをtrustedゾーンへ追加します。
[root@control ~]# firewall-cmd --permanent --zone=trusted --add-interface=tunl0
success
Podネットワーク(10.244.0.0/16)をtrustedゾーンへ追加します。この設定により、Calicoが構成するPodネットワークの通信がfirewalldによって遮断されることを防ぎます。
[root@control ~]# firewall-cmd --permanent --zone=trusted --add-source=10.244.0.0/16
success
クラスタを構成するノードが接続されているネットワーク(192.168.1.0/24)をtrustedゾーンへ追加します。
[root@control ~]# firewall-cmd --permanent --zone=trusted --add-source=192.168.1.0/24
success
永続設定を反映するため、firewalldの設定をリロードします。
[root@control ~]# firewall-cmd --reload
success
(3) 設定確認
tunl0がtrustedゾーンに追加されたことを確認します。
[root@control ~]# firewall-cmd --get-zone-of-interface=tunl0
trusted
trustedゾーンの設定内容を確認します。interfacesにtunl0 が登録されていれば、設定は正しく反映されています。
[root@control ~]# firewall-cmd --zone=trusted --list-all
trusted (active)
  target: ACCEPT
  ingress-priority: 0
  egress-priority: 0
  icmp-block-inversion: no
  interfaces: tunl0
  sources: 10.244.0.0/16 192.168.1.0/24
  services:
  ports:
  protocols:
  forward: yes
  masquerade: no
  forward-ports:
  source-ports:
  icmp-blocks:
  rich rules:
4 ストレージ(Local Path Provisioner)のインストール
Harborは、コンテナイメージやデータベースなどのデータを永続的に保存するために、PersistentVolumeClaim(PVC)を使用します。ここでは、PVCの要求に応じてPersistentVolume(PV)を動的に作成するLocal Path Provisionerをインストールします。Local Path Provisionerは、ノード上のローカルディスクを利用して、ストレージを提供します。
curl コマンドを使用して、Local Path Provisionerのマニフェストファイルをダウンロードします。
[root@control ~]# curl -LO https://raw.githubusercontent.com/rancher/local-path-provisioner/v0.0.36/deploy/local-path-storage.yaml
  % Total    % Received % Xferd  Average Speed   Time    Time     Time  Current
                                 Dload  Upload   Total   Spent    Left  Speed
100  3852  100  3852    0     0   1046      0  0:00:03  0:00:03 --:--:--  1046
curl コマンドの詳しい使い方は、以下のページをご覧ください。
hana-shin.hatenablog.com
ダウンロードしたマニフェストのバックアップを作成します。
[root@control ~]# cp local-path-storage.yaml local-path-storage.yaml.org
テキストエディタを使って、StorageClassをクラスタのデフォルトのStorageClassとして使用するため、local-path-storage.yaml を編集します。
[root@control ~]# vi local-path-storage.yaml
diff コマンドを使用し、StorageClassをデフォルトとして指定するアノテーションが追加されたことを確認します。
[root@control ~]# diff -Nur local-path-storage.yaml.org local-path-storage.yaml
--- local-path-storage.yaml.org 2026-07-12 08:58:45.916523536 +0900
+++ local-path-storage.yaml     2026-07-12 09:00:47.781709321 +0900
@@ -116,6 +116,8 @@
 kind: StorageClass
 metadata:
   name: local-path
+  annotations:
+    storageclass.kubernetes.io/is-default-class: "true"
 provisioner: rancher.io/local-path
 volumeBindingMode: WaitForFirstConsumer
 reclaimPolicy: Delete
編集したマニフェストをKubernetesクラスタに適用し、Local Path Provisionerをインストールします。
[root@control ~]# kubectl apply -f local-path-storage.yaml
namespace/local-path-storage created
serviceaccount/local-path-provisioner-service-account created
role.rbac.authorization.k8s.io/local-path-provisioner-role created
clusterrole.rbac.authorization.k8s.io/local-path-provisioner-role created
rolebinding.rbac.authorization.k8s.io/local-path-provisioner-bind created
clusterrolebinding.rbac.authorization.k8s.io/local-path-provisioner-bind created
deployment.apps/local-path-provisioner created
storageclass.storage.k8s.io/local-path created
configmap/local-path-config created
インストールが完了したら、Local Path ProvisionerのPodが正常に起動しているか確認します。STATUS が Running になっていればOKです。
[root@control ~]# kubectl get pods -n local-path-storage -o wide
NAME                                      READY   STATUS    RESTARTS   AGE   IP              NODE      NOMINATED NODE   READINESS GATES
local-path-provisioner-6d76485965-xq6s2   1/1     Running   0          24s   10.244.189.66   worker2   <none>           <none>
最後に、local-path がデフォルトのStorageClassとして正しく認識されているかを確認します。
[root@control ~]# kubectl get storageclass
NAME                   PROVISIONER             RECLAIMPOLICY   VOLUMEBINDINGMODE      ALLOWVOLUMEEXPANSION   AGE
local-path (default)   rancher.io/local-path   Delete          WaitForFirstConsumer   false                  42s
5 MetalLBのインストール
オンプレミス(自宅・社内インフラなど)では、クラウド環境とは異なり、LoadBalancer型のServiceを作成しても外部IPアドレス(EXTERNAL-IP)が自動で割り当てられません。MetalLBは、オンプレミス環境でもLoadBalancer型Serviceに対して外部IPアドレスを割り当てることができるソフトウェアです。今回は、後ほどHarborへのアクセスに使うIngress Controller(ingress-nginx)を外部公開するためにMetalLBを導入します。
5.1 MetalLBのインストール
MetalLBのリポジトリを追加します。
[root@control ~]# helm repo add metallb https://metallb.github.io/metallb
"metallb" has been added to your repositories
helm コマンドの詳しい使い方は、以下のページをご覧ください。
hana-shin.hatenablog.com
最新のチャート(パッケージ)情報を取得するため、Helmリポジトリの情報を更新します。
[root@control ~]# helm repo update
Hang tight while we grab the latest from your chart repositories...
...Successfully got an update from the "metallb" chart repository
Update Complete. ?Happy Helming!?
Helmを使ってMetalLBをインストールします。--create-namespace を付与することで、専用のNamespace(metallb-system)の作成とインストールを同時に行います。STATUS: deployed となれば成功です。
[root@control ~]# helm install metallb metallb/metallb --namespace metallb-system --create-namespace
I0712 09:11:29.887926   36180 warnings.go:107] "Warning: unrecognized format \"cidr\""
NAME: metallb
LAST DEPLOYED: Sun Jul 12 09:11:29 2026
NAMESPACE: metallb-system
STATUS: deployed
REVISION: 1
DESCRIPTION: Install complete
TEST SUITE: None
NOTES:
MetalLB is now running in the cluster.

Now you can configure it via its CRs. Please refer to the metallb official docs
on how to use the CRs.
helm list コマンドを使い、指定したNamespaceにMetalLBが正常にデプロイされている状態か確認します。
[root@control ~]# helm list -n metallb-system
NAME    NAMESPACE       REVISION        UPDATED                                 STATUS          CHART           APP VERSION
metallb metallb-system  1               2026-07-12 09:11:29.313813192 +0900 JST deployed        metallb-0.16.1  v0.16.1
MetalLBを構成する各Podの状態を確認します。すべてのPodが Running になっていれば正常に動作しています。
[root@control ~]# kubectl get pods -n metallb-system
NAME                                             READY   STATUS    RESTARTS   AGE
metallb-controller-bc9cbb54b-xsts9               1/1     Running   0          2m26s
metallb-frr-k8s-fcdvp                            5/5     Running   0          2m26s
metallb-frr-k8s-jtg94                            5/5     Running   0          2m26s
metallb-frr-k8s-s282w                            5/5     Running   0          2m26s
metallb-frr-k8s-statuscleaner-75b695f48d-dvtnc   1/1     Running   0          2m26s
metallb-speaker-fs475                            1/1     Running   0          2m26s
metallb-speaker-w9p7t                            1/1     Running   0          2m26s
metallb-speaker-wh8fd                            1/1     Running   0          2m26s
MetalLBのWebhook Serviceが作成されていることを確認します。
[root@control ~]# kubectl get svc -n metallb-system
NAME                      TYPE        CLUSTER-IP      EXTERNAL-IP   PORT(S)   AGE
frr-k8s-webhook-service   ClusterIP   10.96.250.168   <none>        443/TCP   4m12s
metallb-webhook-service   ClusterIP   10.111.129.74   <none>        443/TCP   4m12s
5.2 IPプールの設定
MetalLBがLoadBalancer型のServiceに対して、どのIPアドレスを割り当てるべきかを定義したマニフェストを作成します。
- IPAddressPool:払い出すIPアドレスの範囲(今回は 192.168.1.200〜210)を指定します。
- L2Advertisement:定義したIPアドレスを、L2モード(ARP)を使ってネットワーク内に通知するための設定です。
[root@control ~]# vi metallb-pool.yaml
[root@control ~]# cat metallb-pool.yaml
apiVersion: metallb.io/v1beta1
kind: IPAddressPool
metadata:
  name: first-pool
  namespace: metallb-system
spec:
  addresses:
    - 192.168.1.200-192.168.1.210
---
apiVersion: metallb.io/v1beta1
kind: L2Advertisement
metadata:
  name: l2advertisement
  namespace: metallb-system
作成したマニフェストファイルをクラスタに適用します。
[root@control ~]# kubectl apply -f metallb-pool.yaml
ipaddresspool.metallb.io/first-pool created
l2advertisement.metallb.io/l2advertisement created
設定したIPプール(IPAddressPool)が正しく認識され、指定したIPアドレス範囲が登録されているか確認します。
[root@control ~]# kubectl get ipaddresspool -n metallb-system
NAME         AUTO ASSIGN   AVOID BUGGY IPS   ADDRESSES
first-pool   true          false             ["192.168.1.200-192.168.1.210"]
同様に、L2モードの通知設定(L2Advertisement)が正しく登録されているか確認します。
[root@control ~]# kubectl get l2advertisement -n metallb-system
NAME              IPADDRESSPOOLS   IPADDRESSPOOL SELECTORS   INTERFACES
l2advertisement
5.3 動作確認
設定したIPプールから、実際にServiceへIPアドレスが自動で割り当てられるかを確認します。まずは動作確認用として、シンプルなNginxのDeploymentを作成(Podをデプロイ)します。
[root@control ~]# kubectl create deployment nginx-test --image=nginx
deployment.apps/nginx-test created
Deploymentの詳細は、以下のページをご覧ください。
hana-shin.hatenablog.com
作成したNginxのDeploymentを、LoadBalancer 型のServiceとして外部へ公開します。
[root@control ~]# kubectl expose deployment nginx-test --port=80 --type=LoadBalancer
service/nginx-test exposed
作成されたServiceのステータスを確認します。EXTERNAL-IP の欄に、先ほどプールとして指定した範囲内から 192.168.1.200 が自動的に割り当てられていることがわかります。
[root@control ~]# kubectl get svc nginx-test
NAME         TYPE           CLUSTER-IP      EXTERNAL-IP     PORT(S)        AGE
nginx-test   LoadBalancer   10.110.52.162   192.168.1.200   80:31347/TCP   5s
curl コマンドを使い、割り当てられた外部IPアドレス(192.168.1.200)へHTTPリクエストを送信してみます。Serviceを介して背後のNginx Podへと正しくルーティングされ、Nginxから正常な応答が返ってきていることが確認できます。
[root@control ~]# curl http://192.168.1.200
<!DOCTYPE html>
<html>
<head>
<title>Welcome to nginx!</title>
<style>
html { color-scheme: light dark; }
body { width: 35em; margin: 0 auto;
font-family: Tahoma, Verdana, Arial, sans-serif; }
</style>
</head>
<body>
<h1>Welcome to nginx!</h1>
<p>If you see this page, nginx is successfully installed and working.
Further configuration is required for the web server, reverse proxy,
API gateway, load balancer, content cache, or other features.</p>

<p>For online documentation and support please refer to
<a href="https://nginx.org/">nginx.org</a>.<br/>
To engage with the community please visit
<a href="https://community.nginx.org/">community.nginx.org</a>.<br/>
For enterprise grade support, professional services, additional
security features and capabilities please refer to
<a href="https://f5.com/nginx">f5.com/nginx</a>.</p>

<p><em>Thank you for using nginx.</em></p>
</body>
</html>
動作確認が完了したため、テスト用に作成したServiceとDeploymentを削除して環境を元の状態に戻しておきます。
[root@control ~]# kubectl delete svc nginx-test
service "nginx-test" deleted from default namespace
[root@control ~]# kubectl delete deployment nginx-test
deployment.apps "nginx-test" deleted from default namespace
6 イングレスコントローラのインストール
ここでは、ingress-nginxというIngress Controllerをインストールします。
Ingressは、HTTP/HTTPSリクエストをホスト名やURLパスに応じてServiceへルーティングするためのルールを定義するオブジェクトです。しかし、Ingressを定義しただけではリクエストはルーティングされません。Ingressで定義したルールを読み取り、リバースプロキシとして動作し、リクエストを適切なServiceへ振り分ける役割を担うのがIngress Controllerです。
6.1 ingress-nginxのインストール
MetalLBのプールから払い出される、Ingress用のIP(例えば192.168.1.200)に対してホスト名を紐付けます。
- 192.168.1.200 harbor.home.lab
ingress-nginxのHelmリポジトリを追加します。
[root@control ~]# helm repo add ingress-nginx https://kubernetes.github.io/ingress-nginx
"ingress-nginx" has been added to your repositories
Helmリポジトリの情報を最新の状態に更新します。
[root@control ~]# helm repo update
Hang tight while we grab the latest from your chart repositories...
...Successfully got an update from the "metallb" chart repository
...Successfully got an update from the "ingress-nginx" chart repository
Update Complete. ?Happy Helming!?
ingress-nginxをインストールします。--set controller.service.type=LoadBalancerを指定することで、ingress-nginxのServiceがLoadBalancer型で作成され、MetalLBによって外部IPアドレスが自動的に割り当てられます。
[root@control ~]# helm install ingress-nginx ingress-nginx/ingress-nginx \
  --namespace ingress-nginx \
  --create-namespace \
  --set controller.service.type=LoadBalancer
NAME: ingress-nginx
LAST DEPLOYED: Sun Jul 12 10:38:10 2026
NAMESPACE: ingress-nginx
STATUS: deployed
REVISION: 1
DESCRIPTION: Install complete
TEST SUITE: None
NOTES:
The ingress-nginx controller has been installed.
It may take a few minutes for the load balancer IP to be available.
You can watch the status by running 'kubectl get service --namespace ingress-nginx ingress-nginx-controller --output wide --watch'

An example Ingress that makes use of the controller:
  apiVersion: networking.k8s.io/v1
  kind: Ingress
  metadata:
    name: example
    namespace: foo
  spec:
    ingressClassName: nginx
    rules:
      - host: www.example.com
        http:
          paths:
            - pathType: Prefix
              backend:
                service:
                  name: exampleService
                  port:
                    number: 80
              path: /
    # This section is only required if TLS is to be enabled for the Ingress
    tls:
      - hosts:
        - www.example.com
        secretName: example-tls

If TLS is enabled for the Ingress, a Secret containing the certificate and key must also be provided:

  apiVersion: v1
  kind: Secret
  metadata:
    name: example-tls
    namespace: foo
  data:
    tls.crt: <base64 encoded cert>
    tls.key: <base64 encoded key>
  type: kubernetes.io/tls
インストール後、Podの状態を確認します。
[root@control ~]# kubectl get pods -n ingress-nginx
NAME                                        READY   STATUS    RESTARTS   AGE
ingress-nginx-controller-5cd9869bf8-m584m   1/1     Running   0          49s
インストール後、Serviceの状態を確認します。ServiceのEXTERNAL-IPにMetalLBのプール範囲内(192.168.1.200〜192.168.1.210)のIPアドレスが割り当てられていれば成功です。
[root@control ~]# kubectl get svc -n ingress-nginx
NAME                                 TYPE           CLUSTER-IP      EXTERNAL-IP     PORT(S)                      AGE
ingress-nginx-controller             LoadBalancer   10.97.221.138   192.168.1.200   80:32423/TCP,443:32058/TCP   55s
ingress-nginx-controller-admission   ClusterIP      10.98.231.61    <none>          443/TCP                      55s
7 証明書の作成
ここでは、公開認証局(Root CA)の代わりに、コントロールノード上でプライベートCAを構築します。具体的には、作業用ディレクトリを作成し、CAで使用する秘密鍵とCA証明書を作成します。続いて、作成したプライベートCAを使用してHarborのサーバ証明書に署名します。作成する証明書は以下のとおりです。
- PCへインポートするCA証明書
- HarborのHTTPS通信で使用するサーバ証明書
7.1 プライベートCAの証明書の作成
作業用ディレクトリを作成し、cdコマンドでharbor-certsディレクトリへ移動します。
[root@control ~]# mkdir -p ~/harbor-certs
[root@control ~]# cd harbor-certs/
プライベートCAで使用する秘密鍵を作成します。
[root@control test]# openssl genpkey -algorithm RSA -out ca.key -pkeyopt rsa_keygen_bits:4096
[root@control harbor-certs]#
作成した秘密鍵(ca.key)が正常に生成されていることを確認します。
[root@control harbor-certs]# ls -l
合計 4
-rw-------. 1 root root 3268  7月 14 10:49 ca.key
プライベートCAのCA証明書(ca.crt)を作成します。このCA証明書は、Harborのサーバ証明書の検証に使用します。なお、検証環境のため、有効期限は10年(3650日)に設定しています。
[root@control harbor-certs]# openssl req -x509 -new -noenc -key ca.key -sha256 -days 3650 -out ca.crt -subj "/C=JP/ST=Tokyo/L=Machida/O=HomeLab/OU=CA/CN=HomeLab Root CA"
作成したCA証明書(ca.crt)と秘密鍵(ca.key)が正常に生成されていることを確認します。
[root@control harbor-certs]# ls -l
合計 8
-rw-r--r--. 1 root root 2033  7月 14 10:50 ca.crt
-rw-------. 1 root root 3268  7月 14 10:49 ca.key
7.2 harborのサーバ証明書の作成
HarborとHTTPS通信を行うため、harbor.home.lab用のサーバー証明書を作成します。
まず、Harborで使用する4096ビットRSA秘密鍵を生成します。
[root@control harbor-certs]# openssl genpkey -algorithm RSA -out harbor.home.lab.key -pkeyopt rsa_keygen_bits:4096
作成したサーバー秘密鍵が生成されていることを確認します。
[root@control harbor-certs]# ls -l
合計 12
-rw-r--r--. 1 root root 2033  7月 14 10:50 ca.crt
-rw-------. 1 root root 3268  7月 14 10:49 ca.key
-rw-------. 1 root root 3272  7月 14 10:51 harbor.home.lab.key
続いて、秘密鍵を使用してCSR(Certificate Signing Request:証明書署名要求)を作成します。CSRには、証明書へ埋め込むサーバー名などの情報が含まれます。
[root@control harbor-certs]# openssl req -new -key harbor.home.lab.key \
  -out harbor.home.lab.csr \
  -subj "/C=JP/ST=Tokyo/L=Machida/O=HomeLab/OU=Harbor/CN=harbor.home.lab"
CSR(harbor.home.lab.csr)とサーバー秘密鍵(harbor.home.lab.key)が生成されていることを確認します。
[root@control harbor-certs]# ls -l
合計 16
-rw-r--r--. 1 root root 2033  7月 14 10:50 ca.crt
-rw-------. 1 root root 3268  7月 14 10:49 ca.key
-rw-r--r--. 1 root root 1704  7月 14 10:51 harbor.home.lab.csr
-rw-------. 1 root root 3272  7月 14 10:51 harbor.home.lab.key
サーバー証明書へSAN(Subject Alternative Name)を設定するための設定ファイルを作成します。Webブラウザでは、証明書のSANに接続先のホスト名やIPアドレスが登録されていることが必須となっています。
[root@control harbor-certs]# vi harbor.home.lab.ext
[root@control harbor-certs]# cat harbor.home.lab.ext
authorityKeyIdentifier=keyid,issuer
basicConstraints=CA:FALSE
keyUsage = digitalSignature, nonRepudiation, keyEncipherment, dataEncipherment
extendedKeyUsage = serverAuth
subjectAltName = @alt_names

[alt_names]
DNS.1 = harbor.home.lab
IP.1 = 192.168.1.200
作成したCSRをプライベートCAの秘密鍵で署名し、Harborのサーバー証明書を発行します。検証環境のため、有効期限は1年(365日)に設定しています。
[root@control harbor-certs]# openssl x509 -req -in harbor.home.lab.csr -CA ca.crt -CAkey ca.key -CAcreateserial -out harbor.home.lab.crt -days 365 -sha256 -extfile harbor.home.lab.ext
Certificate request self-signature ok
subject=C=JP, ST=Tokyo, L=Machida, O=HomeLab, OU=Harbor, CN=harbor.home.lab
サーバー証明書(harbor.home.lab.crt)、CSR、秘密鍵などのファイルが生成されていることを確認します。
[root@control harbor-certs]# ls -l
合計 28
-rw-r--r--. 1 root root 2033  7月 14 10:50 ca.crt
-rw-------. 1 root root 3268  7月 14 10:49 ca.key
-rw-r--r--. 1 root root   41  7月 14 10:52 ca.srl
-rw-r--r--. 1 root root 2126  7月 14 10:52 harbor.home.lab.crt
-rw-r--r--. 1 root root 1704  7月 14 10:51 harbor.home.lab.csr
-rw-r--r--. 1 root root  257  7月 14 10:52 harbor.home.lab.ext
-rw-------. 1 root root 3272  7月 14 10:51 harbor.home.lab.key
最後に、サーバー証明書へSANが正しく設定されていることを確認します。
[root@control harbor-certs]# openssl x509 -in harbor.home.lab.crt -text -noout | grep -A2 "Subject Alternative Name"
            X509v3 Subject Alternative Name:
                DNS:harbor.home.lab, IP Address:192.168.1.200
            X509v3 Subject Key Identifier:
7.3 Kubernetes Secretへの登録
harabor Namespaceを作成します。
[root@control harbor-certs]# kubectl create namespace harbor
namespace/harbor created
HarborのIngressからTLS証明書を利用できるよう、作成したサーバー証明書と秘密鍵をKubernetes Secretとして登録します。
[root@control harbor-certs]# kubectl create secret tls harbor-tls \
  --cert=harbor.home.lab.crt \
  --key=harbor.home.lab.key \
  -n harbor
secret/harbor-tls created
[root@control harbor-certs]#
ConfigMap/Secretの詳細は、以下のページをご覧ください。
hana-shin.hatenablog.com
作成したTLS Secretが登録されていることを確認します。
[root@control harbor-certs]# kubectl get secret harbor-tls -n harbor
NAME         TYPE                DATA   AGE
harbor-tls   kubernetes.io/tls   2      30s
8 PC側の作業
PCのブラウザから、コントロールノード上で稼働するHarborへHTTPSでアクセスします。このとき、ブラウザはHarborから送られてくるサーバ証明書を検証します。サーバ証明書の検証には、CA証明書に含まれる公開鍵が使用されます。そのため、事前にCA証明書をPCへインポートしておく必要があります。ここでは、CA証明書をWindowsへインポートする手順を説明します。
8.1 hostsファイルの編集
PCからHarborへホスト名でアクセスできるよう、Windowsのhostsファイル(C:\Windows\System32\drivers\etc\hosts)に以下の内容を追記します。
192.168.1.200 harbor.home.lab
8.2 CA証明書のインポート
コントロールノードで作成したCA証明書(ca.crt)をPCへ転送します。次に、転送したCA証明書をWindowsの証明書ストア(信頼されたルート証明機関)へインポートします。ChromeやMicrosoft EdgeはWindowsの証明書ストアを利用するため、この設定を行うことで、ブラウザからHarborへHTTPSでアクセスすることができるようになります。
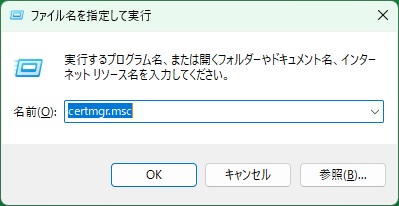
まず、[Windows]キー + [R] を押して 「ファイル名を指定して実行」 を開きます。そして、「certmgr.msc」 と入力し、「OK」 をクリックします。
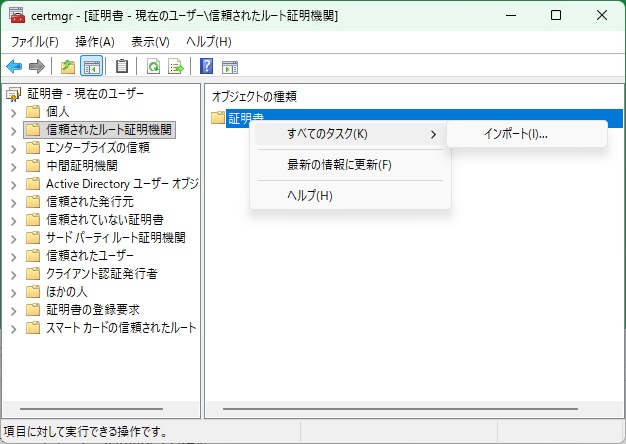
証明書マネージャー(Certmgr)が起動したら、「信頼されたルート証明機関」→「証明書」 を右クリックし、「すべてのタスク」→「インポート」 を選択します。その後、ウィザードに従って転送したCA証明書を選択し、Windowsへインポートします。
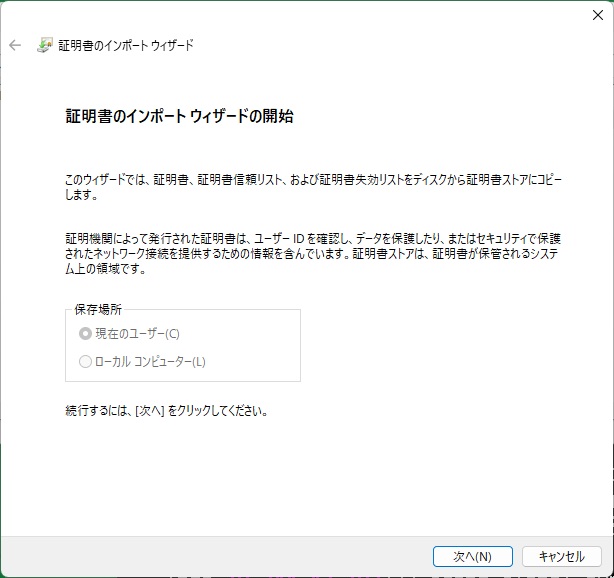
「次へ」をクリックする。
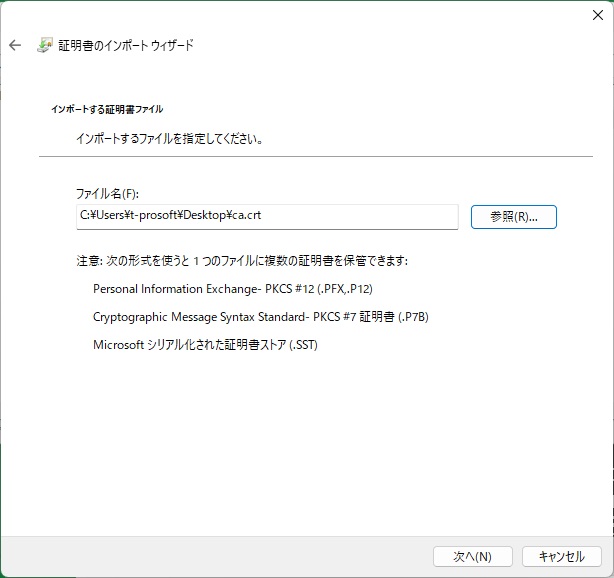
作成したCA証明書(ca.crt)を指定して「次へ」をクリックします。
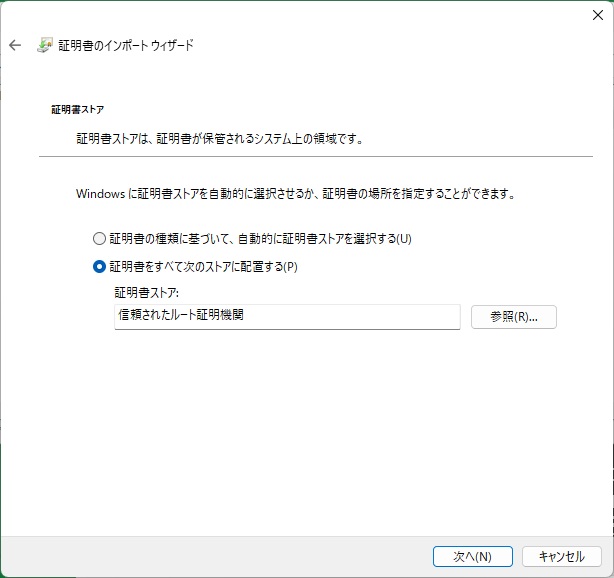
「証明書をすべて次のストアに配置する(P)」から「信頼されたルート証明機関」を選択して「次へ」をクリックする。
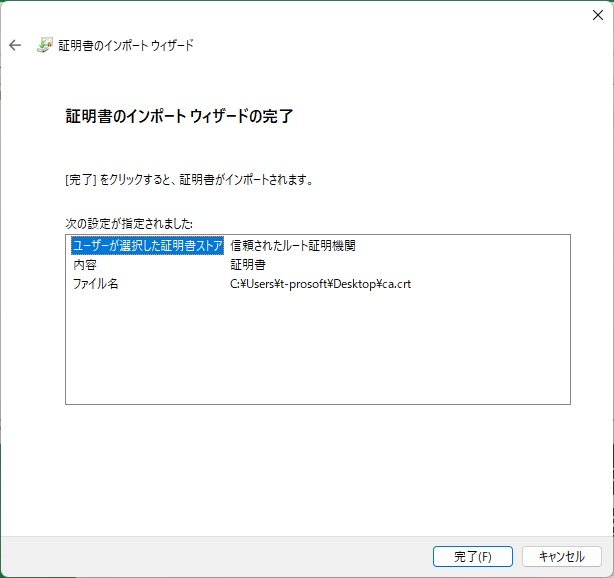
「完了」をクリックする。
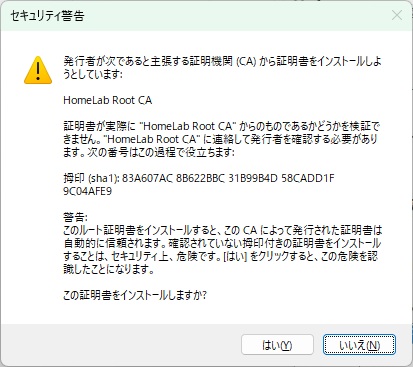
「はい」をクリックする
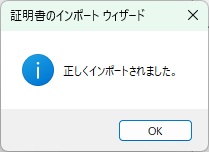
「正しくインポートされました」のポップアップ画面を確認する。
9 Harborのインストール
Harbor用のNamespaceを作成します。
[root@control ~]# kubectl create namespace harbor
namespace/harbor created
Harborのリポジトリを追加します。
[root@control ~]# helm repo add harbor https://helm.goharbor.io
"harbor" has been added to your repositories
リポジトリの情報を最新の状態に更新します。
[root@control ~]# helm repo update
Hang tight while we grab the latest from your chart repositories...
...Successfully got an update from the "metallb" chart repository
...Successfully got an update from the "ingress-nginx" chart repository
...Successfully got an update from the "harbor" chart repository
Update Complete. ?Happy Helming!?
追加したリポジトリを確認します。
[root@control ~]#  helm repo list
NAME            URL
metallb         https://metallb.github.io/metallb
ingress-nginx   https://kubernetes.github.io/ingress-nginx
harbor          https://helm.goharbor.io
helm search repoコマンドを実行して、リポジトリに登録されているチャートを確認します。実行結果から、harborチャートが利用可能であることを確認できます。
[root@control ~]# helm search repo harbor
NAME            CHART VERSION   APP VERSION     DESCRIPTION
harbor/harbor   1.19.1          2.15.1          An open source trusted cloud native registry th...
Harborインストール用の作業ディレクトリを作成します。
[root@control ~]# mkdir -p ~/harbor-install
HarborはHelmチャートを使用してインストールします。Helmでは、values.yamlに設定を記述することで、デフォルト設定を変更できます。ここでは、Harborへアクセスするホスト名やTLSの設定、永続ストレージの設定、管理者パスワードなどを指定するため、values.yamlを作成します。
[root@control ~]# vi ~/harbor-install/values.yaml
[root@control ~]# cat ~/harbor-install/values.yaml
expose:
  type: ingress
  tls:
    enabled: true
    certSource: secret
    secret:
      secretName: "harbor-tls"
  ingress:
    hosts:
      core: harbor.home.lab
    className: "nginx"

externalURL: https://harbor.home.lab

persistence:
  enabled: true
  persistentVolumeClaim:
    registry:
      storageClass: "local-path"
      size: 20Gi
    jobservice:
      jobLog:
        storageClass: "local-path"
        size: 1Gi
    database:
      storageClass: "local-path"
      size: 5Gi
    redis:
      storageClass: "local-path"
      size: 1Gi
    trivy:
      storageClass: "local-path"
      size: 5Gi

harborAdminPassword: "Harbor12345"
Harborをインストールします。-fオプションで指定したvalues.yamlの内容(Ingress・TLS・永続化ストレージの設定)が反映されます。
[root@control ~]# helm install harbor harbor/harbor -n harbor -f ~/harbor-install/values.yaml
NAME: harbor
LAST DEPLOYED: Sun Jul 12 11:24:12 2026
NAMESPACE: harbor
STATUS: deployed
REVISION: 1
DESCRIPTION: Install complete
TEST SUITE: None
NOTES:
Please wait for several minutes for Harbor deployment to complete.
Then you should be able to visit the Harbor portal at https://harbor.home.lab
For more details, please visit https://github.com/goharbor/harbor
Harborがインストールされていることを確認します。
[root@control ~]# helm list -n harbor
NAME    NAMESPACE       REVISION        UPDATED                                 STATUS          CHART           APP VERSION
harbor  harbor          1               2026-07-12 11:24:12.830505033 +0900 JST deployed        harbor-1.19.1   2.15.1
HarborのPodが正常に起動したことを確認します。
[root@control ~]# kubectl get pods -n harbor
NAME                                 READY   STATUS    RESTARTS      AGE
harbor-core-767d58bf54-6kh8f         1/1     Running   0             2m32s
harbor-database-0                    1/1     Running   0             2m32s
harbor-jobservice-84b7976678-l88l5   1/1     Running   4 (80s ago)   2m32s
harbor-portal-5b6bc45d5c-wtwd6       1/1     Running   0             2m32s
harbor-redis-0                       1/1     Running   0             2m32s
harbor-registry-54f749db94-x2spw     2/2     Running   0             2m32s
harbor-trivy-0                       1/1     Running   0             2m32s
Harborでは、コンテナイメージやデータベース、Redisなどの永続データをPersistentVolumeClaim(PVC)に保存します。すべてのPVCが Bound になっていれば、PersistentVolumeが正常に割り当てられています。
[root@control ~]# kubectl get pvc -n harbor
NAME                              STATUS   VOLUME                                     CAPACITY   ACCESS MODES   STORAGECLASS   VOLUMEATTRIBUTESCLASS   AGE
data-harbor-redis-0               Bound    pvc-b5442603-8404-481e-8b93-938faf3e785e   1Gi        RWO            local-path     <unset>                 3m7s
data-harbor-trivy-0               Bound    pvc-b5fe7ad0-3510-44cc-a733-cb84a8f17eea   5Gi        RWO            local-path     <unset>                 3m7s
database-data-harbor-database-0   Bound    pvc-49907738-2af0-4864-b698-81f58eba1839   1Gi        RWO            local-path     <unset>                 3m7s
harbor-jobservice                 Bound    pvc-d236097f-637c-4525-b4bb-ecf4c7f9ed5e   1Gi        RWO            local-path     <unset>                 3m7s
harbor-registry                   Bound    pvc-f9800439-4cb1-4cca-b57b-a80b3ae96771   5Gi        RWO            local-path     <unset>                 3m7s
Harbor用のIngressリソースが作成されていることを確認します。HOSTSにharbor.home.lab、ADDRESSにMetalLBから割り当てられたIPアドレスが表示されていれば、Ingressが正しく構成されています。
[root@control ~]# kubectl get ingress -n harbor
NAME             CLASS   HOSTS             ADDRESS         PORTS     AGE
harbor-ingress   nginx   harbor.home.lab   192.168.1.200   80, 443   34h
10 Harbor管理画面へのログイン
ブラウザで https://harbor.home.lab/ にアクセスします。
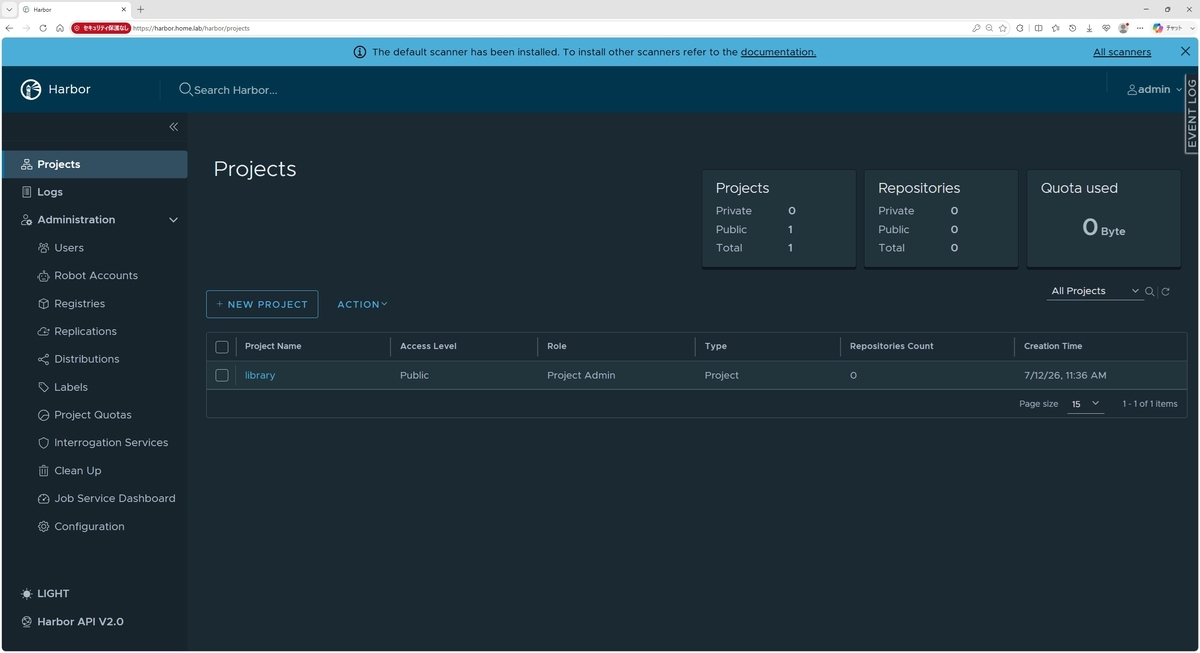
ログイン画面が表示されたら、ユーザー名に 「admin」、パスワードに 「Harbor12345」 を入力してログインします。パスワードには、values.yaml の harborAdminPassword に設定した値を使用します。

ログインに成功すると、以下のようにHarborの管理画面が表示されます。
Z 参考図書
今回の記事執筆にあたり参考にした図書は以下のものです。
