BeautifulSoupライブラリの使い方


- 1 Beautiful Soupとは?
- 2 検証環境
- 3 BeautifulSoupのインストール方法
- 4 事前準備
- 5 メソッドの使い方
- 6 タグから情報を取得する方法
- 7 実践練習1(Anacondのソースコードダウンロード)
- 8 実践練習2(歴代首相の一覧)
- 9 実践練習3(高校野球歴代優勝校の一覧)
- Y 参考図書
- Z 参考情報
1 Beautiful Soupとは?
Beautiful Soupは、HTMLファイルを解析および処理するためのライブラリです。このライブラリを使って、まずはローカルマシン上で基本的な使い方を練習し、その後、以下のウェブサイトから情報を抽出するテストプログラムを作成してみます。なお作成するテストプログラムですが、見やすくするため、例外処理等は実装していません。
- Anacondaのインストールシェルプログラムの一覧
- 歴代首相の名前の一覧
- 夏の高校野球(全国高等学校野球選手権大会)歴代優勝校の一覧
2 検証環境
AlmaLinux版数は以下のとおりです。
[root@server ~]# cat /etc/redhat-release
AlmaLinux release 9.2 (Turquoise Kodkod)
カーネル版数は以下のとおりです。
[root@server ~]# uname -r
5.14.0-284.11.1.el9_2.x86_64
pythonの版数は以下のとおりです。
[root@server ~]# python -V
Python 3.9.16
3 BeautifulSoupのインストール方法
pipコマンドでbeautifulsoup4ライブラリをインストールします。
[root@server ~]# pip install beautifulsoup4
beautifulsoup4の版数を確認します。
[root@server ~]# pip show beautifulsoup4
Name: beautifulsoup4
Version: 4.12.2
Summary: Screen-scraping library
Home-page:
Author:
Author-email: Leonard Richardson <leonardr@segfault.org>
License:
Location: /usr/local/lib/python3.9/site-packages
Requires: soupsieve
Required-by:
4 事前準備
BeautifulSoupの使い方に慣れるため、ローカルマシンでHTMLファイルを作成して、それを読み込むテストプログラムを作成してみます。
[root@server ~]# vi index.html
[root@server ~]# cat index.html
<!DOCTYPE html>
<html>
<head>
    <title>サンプルHTML</title>
</head>
<body>
    <div id="chapter1">
        <h1>これは見出し1です</h1>
        <h2>これは見出し2です</h2>
        <h3>これは見出し3です</h3>
        <p>これは段落です。段落はテキストを表示するために使用されます。</p>
        <ul>
            <li>リスト項目1</li>
            <li>リスト項目2</li>
        </ul>
        <ol>
            <li>項目1</li>
            <li>項目2</li>
        </ol>
        <dl>
            <dt>用語1</dt>
            <dd>用語1の説明</dd>
        </dl>
    </div>
    <div id="chapter2">
      <a href="https://www.example.com" target="_blank">www.example.comへのリンクです。aタグにtarget属性が設定されています。クリックすると新しいタブが開きます</a>
      <br>
      <a href="https://www.kantei.go.jp" title="首相官邸">首相官邸へのリンクです。aタグにtitle属性が設定されています。マウスカーソルをリンクに合わせると、ツールチップが表示されます。</a>
    </div>
</body>
</html>
作成したHTMLファイルを/var/www/htmlにコピーします。
[root@server ~]# cp index.html /var/www/html/
httpdサービスを起動します。
[root@server ~]# systemctl start httpd
httpdプロセスがListenしているTCPの80番ポートを解放します。なお、firewall-cmdコマンドの使い方は、firewall-cmdの使い方 - hana_shinのLinux技術ブログを参照してください。
[root@server ~]# firewall-cmd --add-port=80/tcp
success
解放しているポート番号を確認します。80番ポートが解放されていることがわかります。
[root@server ~]# firewall-cmd --list-ports
80/tcp
httpdに対してcurlコマンドを実行すると、HTMLファイルを読み出していることがわかります。なお、curlコマンドの使い方は、curlコマンドの使い方 - hana_shinのLinux技術ブログを参照してください。
[root@server ~]# curl http://192.168.1.200
<!DOCTYPE html>
<html>
<head>
    <title>サンプルHTML</title>
-snip-
5 メソッドの使い方
Beautiful Soupオブジェクトは、HTMLファイルから特定の条件を満たすタグを取得するのに、findやfind_allというメソッドを利用することができます。
| メソッド | 概要 |
|---|---|
| find | 引数に指定した条件に合致する最初の要素を取得します。一致する要素が複数ある場合でも、最初に見つかった要素だけが返されます |
| find_all | 指定した条件に合致するすべての要素を取得します。複数の要素が一致する場合、それらの要素がリストとして返されます。 |
5.1 findメソッドの使い方(タグ名を指定した場合)
指定したタグのタグオブジェクトおよびテキストを返すテストプログラムを作成します。
[root@server ~]# cat test.py
#!/usr/bin/python3

import requests
from bs4 import BeautifulSoup

response = requests.get("http://192.168.1.200/index.html")
soup = BeautifulSoup(response.content, "html.parser")
print(soup.find("title"))
print(soup.find("h1"))
print(soup.find("li"))

print(soup.find("title").text)
print(soup.find("h1").text)
print(soup.find("li").text)
テストプログラムを実行すると、1行目から3行目までがHTMLのタグを表しており、4行目から6行目までがそれらのタグに含まれるテキストを表示していることが確認できます。
[root@server ~]# ./test.py
<title>サンプルHTML</title>
<h1>これは見出し1です</h1>
<li>リスト項目1</li>
サンプルHTML
これは見出し1です
リスト項目1
5.2 findメソッドの使い方(属性を指定した場合)
属性がchapter2のコンテンツだけを表示するテストプログラムを作成します。
[root@server ~]# cat test.py
#!/usr/bin/python3

import requests
from bs4 import BeautifulSoup

response = requests.get("http://192.168.1.200/index.html")
soup = BeautifulSoup(response.content, "html.parser")
content = soup.find(id="chapter2")
print(content)
テストプログラムを実行すると、chapter2という属性を持つコンテンツだけが表示されます。chapter1属性を持つコンテンツは表示されません。
[root@server ~]# ./test.py
<div id="chapter2">
<a href="https://www.example.com" target="_blank">www.example.comへのリンクです。<a>タグにtarget属性が設定されています。クリックすると新しいタブが開きます</a>
<br/>
<a href="https://www.kantei.go.jp" title="首相官邸">首相官邸へのリンクです。<a>タグにtitle属性が設定されています。マウスカーソルをリンクに合わせると、ツールチップが表示されます。</a>
</div>
5.3 find_allメソッドの使い方
liタグのテキストを全て表示するテストプログラムを作成します。
[root@server ~]# cat test.py
#!/usr/bin/python3

import requests
from bs4 import BeautifulSoup

response = requests.get("http://192.168.1.200/index.html")
soup = BeautifulSoup(response.content, "html.parser")
for element in soup.find_all("li"):
    print(element.text)
テストプログラムを実行すると、全てのliタグのテキストが表示されていることがわかります。
[root@server ~]# ./test.py
リスト項目1
リスト項目2
項目1
項目2
6 タグから情報を取得する方法
タグから情報を取得するテストプログラムを作成します。
[root@server ~]# cat test.py
#!/usr/bin/python3

import requests
from bs4 import BeautifulSoup

response = requests.get("http://192.168.1.200/index.html")
soup = BeautifulSoup(response.content, "html.parser")
content = soup.find("a")
print(content)
print(content.name)
print(content.text)
print(content.attrs)
print(content.get("href"))テストプログラムを実行します。1行目はタグ、2行目はタグ名、3行目はタグのテキスト、4行目は属性、5行目は指定した属性の値が表示されていることがわかります。
[root@server ~]# ./test.py
<a href="https://www.example.com" target="_blank">www.example.comへのリンクです。aタグにtarget属性が設定されています。クリックすると新しいタブが開きます</a>
a
www.example.comへのリンクです。aタグにtarget属性が設定されています。クリックすると新しいタブが開きます
{'href': 'https://www.example.com', 'target': '_blank'}
https://www.example.com
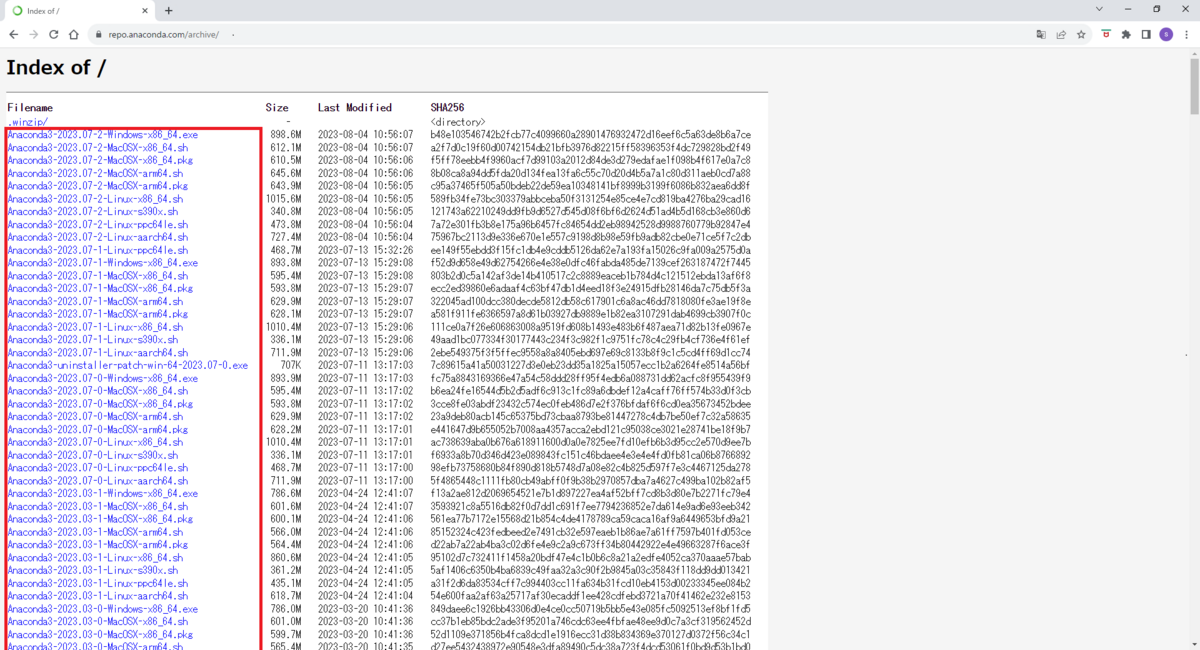
7 実践練習1(Anacondのソースコードダウンロード)
Anacondaのウェブページで提供されている以下のソースコード(赤枠内)から、拡張子が.shのファイルをダウンロードするテストプログラムを作成します。
https://repo.anaconda.com/archive/
AnacondaのwebページからHTMLファイルを取得するテストプログラムを作成します。このテストプログラムを実行することで、Anacondaのwebページがどのような構成になっているかを確認することができます。
[root@server ~]# cat test.py
#!/usr/bin/python3

import requests
from bs4 import BeautifulSoup

response = requests.get("https://repo.anaconda.com/archive/")
soup = BeautifulSoup(response.content, "html.parser")
print(soup)テストプログラムを実行します。このときlessコマンドを併用しながら、AnacondaのwebサイトのHTMLファイルの構成を確認します。拡張子が.shのファイルは、タグ内に存在することがわかります。
<tr>
<td><a href="Anaconda3-2023.07-2-Linux-x86_64.sh">Anaconda3-2023.07-2-Linux-x86_64.sh</a></td>
<td class="s">1015.6M</td>
<td>2023-08-04 10:56:05</td>
<td>589fb34fe73bc303379abbceba50f3131254e85ce4e7cd819ba4276ba29cad16</td>
</tr>
<tr>
テストプログラムを改良して、AnacondaのウェブサイトのHTMLからタグだけを表示するようにします。
[root@server ~]# cat test.py
#!/usr/bin/python3

import requests
from bs4 import BeautifulSoup

response = requests.get("https://repo.anaconda.com/archive/")
soup = BeautifulSoup(response.content, "html.parser")
a_tags = soup.find_all("a")
for a_tag in a_tags:
print(a_tag)テストプログラムを実行すると、タグの内容が表示されていることがわかります。
[root@server ~]# ./test.py
<a href=".winzip/">.winzip/</a>
<a href="Anaconda3-2023.07-2-Windows-x86_64.exe">Anaconda3-2023.07-2-Windows-x86_64.exe</a>
<a href="Anaconda3-2023.07-2-MacOSX-x86_64.sh">Anaconda3-2023.07-2-MacOSX-x86_64.sh</a>
<a href="Anaconda3-2023.07-2-MacOSX-x86_64.pkg">Anaconda3-2023.07-2-MacOSX-x86_64.pkg</a>
-snip-
テストプログラムを改良して、タグからhref属性で参照されるリンクだけを表示し、かつ拡張子が "sh" のリンクだけを抽出するようにします。
[root@server ~]# cat test.py
#!/usr/bin/python3

import requests
from bs4 import BeautifulSoup

response = requests.get("https://repo.anaconda.com/archive/")
soup = BeautifulSoup(response.content, "html.parser")

file_links = []
a_tags = soup.find_all("a")
for a_tag in a_tags:
    url = a_tag.get("href")
    if url.endswith(".sh"):
        file_links.append(url)
        print(url)
テストプログラムを実行すると、表示される内容は拡張子が.shであるリンクだけであることがわかります。
[root@server ~]# ./test.py
Anaconda3-2023.07-2-MacOSX-x86_64.sh
Anaconda3-2023.07-2-MacOSX-arm64.sh
Anaconda3-2023.07-2-Linux-x86_64.sh
-snip-
テストプログラムを改良して、ダウンロードするファイルを保存するディレクトリを作成します。そして、作成したディレクトリに拡張子が.shのファイルを2つだけ保存します。
[root@server ~]# cat test.py
#!/usr/bin/python3
import os
import requests
from bs4 import BeautifulSoup

# AnacondaのサイトからHTMLファイルを取得する。
archive_url = "https://repo.anaconda.com/archive/"
response = requests.get(archive_url)
soup = BeautifulSoup(response.content, "html.parser")

# 拡張子がshのファイルだけリンクをfile_linksに格納する。
file_links = []
a_tags = soup.find_all("a")
for a_tag in a_tags:
    url = a_tag.get("href")
    if url.endswith(".sh"):
        file_links.append(url)

# ダウンロードしたファイルを格納するディレクトリを作成する
download_dir = "./download/"
if not os.path.exists(download_dir):
    os.mkdir(download_dir)

# Anacondaのサイトから拡張子がshのファイルを2つダウンロードする。
for i, file_link in enumerate(file_links[:2], 1):
    file_name = file_link.split("/")[-1]
    file_url = archive_url + file_link
    file_path = download_dir + file_name
    print(f"ダウンロード {i}: {file_path} : {file_url}")
    response = requests.get(file_url)
    with open(file_path, "wb") as file:
        file.write(response.content)
テストプログラムを実行します。拡張子がshのファイルを2つだけダウンロードします。
[root@server ~]# ./test.py
ダウンロード 1: ./download/Anaconda3-2023.07-2-MacOSX-x86_64.sh : https://repo.anaconda.com/archive/Anaconda3-2023.07-2-MacOSX-x86_64.sh
ダウンロード 2: ./download/Anaconda3-2023.07-2-MacOSX-arm64.sh : https://repo.anaconda.com/archive/Anaconda3-2023.07-2-MacOSX-arm64.sh
ダウンロードしたファイルを確認します。
[root@server ~]# ls -l download/*
-rw-r--r--. 1 root root 676990792  9月 16 23:37 download/Anaconda3-2023.07-2-MacOSX-arm64.sh
-rw-r--r--. 1 root root 641855956  9月 16 23:36 download/Anaconda3-2023.07-2-MacOSX-x86_64.sh
8 実践練習2(歴代首相の一覧)
以下のページに記載されている歴代首相の名前と年を一覧として表示してみます。
https://www.kantei.go.jp/jp/rekidainaikaku/index.html
歴代首相が記載されていwebページからHTMLファイルを取得するテストプログラムを作成します。このテストプログラムを実行することで、webページがどのような構成になっているかを確認することができます。
[root@server ~]# cat test.py
#!/usr/bin/python3
import os
import requests
from bs4 import BeautifulSoup

url = "https://www.kantei.go.jp/jp/rekidainaikaku/index.html"
response = requests.get(url)
soup = BeautifulSoup(response.content, "html.parser")
print(soup)
テストプログラムを実行すると、歴代首相の代と名前が以下の構成で繰り返し出現していることがわかります。
<div class="his-profile">
<h3 class="his-generation">第101代</h3>
<p class="his-name"><a href="/jp/rekidainaikaku/101.html">岸田 文雄</a></p>
</div>
テストプログラムを修正します。h3タグ、pタグのclass属性を指定して歴代首相の名前と代を抽出します。
[root@server ~]# cat test.py
#!/usr/bin/python3
import os
import requests
from bs4 import BeautifulSoup

url = "https://www.kantei.go.jp/jp/rekidainaikaku/index.html"
response = requests.get(url)
soup = BeautifulSoup(response.content, "html.parser")

prime_minister_elements = soup.find_all("div", class_="his-profile")

for i, prime_minister_element in enumerate(prime_minister_elements, start=1):
    generation_element = prime_minister_element.find("h3", class_="his-generation")
    name_element = prime_minister_element.find("p", class_="his-name")

    if generation_element and name_element:
        generation = generation_element.text.strip()
        name = name_element.text.strip()
        print(f"{generation}:{name}")
テストプログラムを実行します。
[root@server ~]# ./test.py
第101代:岸田 文雄
第100代:岸田 文雄
第99代:菅 義偉
第98代:安倍 晋三
第97代:安倍 晋三
第96代:安倍 晋三
第95代:野田 佳彦
第94代:菅 直人
第93代:鳩山 由紀夫
第92代:麻生 太郎
-snip-
9 実践練習3(高校野球歴代優勝校の一覧)
以下のページに記載されている歴代の優勝校と優勝年を一覧として表示してみます。
https://www.hanshin.co.jp/koshien/highschool/past/champion/summer.html
8章のようなテストプログラムを作成して実行すると、歴代の優勝高校と優勝年が以下の構成で繰り返し出現していることがわかります。
<tr>
<td>1</td>
<td>大正4年(1915)</td>
<td>京都二中(京都)</td>
</tr>
HTMLファイルの構成を考慮してテストプログラムを作成します。優勝年と優勝校は
[root@server ~]# cat test.py
#!/usr/bin/python3
import os
import requests
from bs4 import BeautifulSoup

url = "https://www.hanshin.co.jp/koshien/highschool/past/champion/summer.html"

response = requests.get(url)
soup = BeautifulSoup(response.content, "html.parser")

champion_list = soup.find_all("tr")
current_year_group = None

for row in reversed(champion_list):
    columns = row.find_all("td")
    if len(columns) == 3:
        year_text = columns[1].text.strip()
        school_text = columns[2].text.strip()

        year_start = year_text.find("(")
        year_end = year_text.find(")")
        if year_start != -1 and year_end != -1:
            year = year_text[year_start + 1:year_end]
            school = school_text.split("(")[0]
            print(f"{year}: {school}")
テストプログラムを実行すると、歴代の優勝高校と優勝年が表示されていることがわかります。
[root@server ~]# ./test.py
2022: 仙台育英
2021: 智辯和歌山
2020: 新型コロナウイルス感染症の流行により中止
2019: 履正社
2018: 大阪桐蔭
-snip-
Y 参考図書

TECHNICAL MASTER はじめてのAlmaLinux 9 & Rocky Linux 9 Linuxサーバエンジニア入門編

Z 参考情報
私が業務や記事執筆で参考にした書籍を以下のページに記載します。
Linux技術のスキルアップをしよう! - hana_shinのLinux技術ブログ
記事作成に参考にした書籍です。
- Pythonコードレシピ集
サンプルコードが短く、分かりやすいです。
Pythonコードレシピ集(単行本)

- スッキリわかるPython入門 (スッキリわかる入門シリーズ)
簡潔な説明で分かりやすいです。

スッキリわかるPython入門 (スッキリわかる入門シリーズ)(単行本)
スッキリわかるPython入門 (スッキリわかるシリーズ)(Kindle版)