

1 はじめに
IPsecは安全なIP通信を実現するための仕組みです。データの暗号化、宛先の認証、データの改ざん検知により、なりすまし等を防ぐことができます。ここでは、IPsecの検証環境を構築してみます。
2 検証環境
ネットワーク構成は以下のとおりです。各ネットワークを以下のように呼びます。ネットワーク2を通過するパケットをIPsecで暗号化します。
192.168.10.0/24 => ネットワーク1
192.168.20.0/24 => ネットワーク2
192.168.30.0/24 => ネットワーク3
                                    |<--- IPsec --->|

           192.168.10.0/24           192.168.20.0/24           192.168.30.0/24
+- client -+             +- router1 -+             +- router2 -+             +- server -+
|          |             |           |             |           |             |          |
| Centos7.9|             |  Alma8.6  |             |  Alma8.6  |             |Centos7.9 |
|          | .10     .20 |           | .10     .20 |           | .10     .20 |          |
|         eth1 --------- eth1       eth2 --------- eth1        eth2 -------- eth1       |
|          |             |           |             |           |             |          |
|          |             |           |             |           |             |          |
|          |             |           |             |           |             |          |
+-- eth0 --+             +--- eth0 --+             +--- eth0 --+             +-- eth0 --+
     | .153                    | .208                    | .25                    | .128
     |                         |                         |                        |
-----------------------------------------------------------------------------------------
                                      192.168.122.0/24
2.1 クライアント、サーバの版数
CentOSの版数は以下のとおりです。
[root@server ~]# cat /etc/redhat-release
CentOS Linux release 7.9.2009 (Core)
カーネル版数は以下のとおりです。
[root@server ~]# uname -r
3.10.0-1160.el7.x86_64
2.2 ルータの版数
AlmaLinuxの版数は以下のとおりです。
[root@router1 ~]# cat /etc/redhat-release
AlmaLinux release 8.6 (Sky Tiger)
カーネル版数は以下のとおりです。
[root@router1 ~]# uname -r
4.18.0-372.9.1.el8.x86_64
3 事前準備
ここでは、ルーティング機能の有効化、およびルーティングテーブルの設定について説明します。その他(仮想マシンへのNIC追加、IPアドレス設定)の説明は割愛します。
3.1 ルーティング機能の有効化
ルータ1のルーティング機能を有効にします。
[root@router1 ~]# vi /etc/sysctl.d/90-ipsec.conf
[root@router1 ~]# cat /etc/sysctl.d/90-ipsec.conf
net.ipv4.ip_forward = 1
ルータ2のルーティング機能を有効にします。
[root@router2 ~]# vi /etc/sysctl.d/90-ipsec.conf
[root@router2 ~]# cat /etc/sysctl.d/90-ipsec.conf
net.ipv4.ip_forward = 1
3.2 ルーティングテーブルの設定
3.2.1 クライアント
ルーティングテーブルを設定します。
[root@client ~]# nmcli connection modify eth1 ipv4.routes "192.168.20.0/24 192.168.10.10" +ipv4.routes "192.168.30.0/24 192.168.10.10"
ルーティングテーブルを確認します。
[root@client ~]# ip r
default via 192.168.122.1 dev eth0 proto dhcp metric 100
192.168.10.0/24 dev eth1 proto kernel scope link src 192.168.10.10 metric 101
192.168.20.0/24 via 192.168.10.20 dev eth1 proto static metric 101
192.168.30.0/24 via 192.168.10.20 dev eth1 proto static metric 101
192.168.122.0/24 dev eth0 proto kernel scope link src 192.168.122.153 metric 100
3.2.2 ルータ1
ルーティングテーブルを設定します。
[root@router1 ~]# nmcli connection modify eth2 ipv4.routes "192.168.30.0/24 192.168.20.10"
ルーティングテーブルを確認します。
[root@router1 ~]# ip r
default via 192.168.122.1 dev eth0 proto dhcp metric 100
192.168.10.0/24 dev eth1 proto kernel scope link src 192.168.10.20 metric 101
192.168.20.0/24 dev eth2 proto kernel scope link src 192.168.20.10 metric 102
192.168.30.0/24 via 192.168.20.20 dev eth2 proto static metric 102
192.168.122.0/24 dev eth0 proto kernel scope link src 192.168.122.208 metric 100
3.2.3 ルータ2
ルーティングテーブルを設定します。
nmcli connection modify eth1 ipv4.routes "192.168.10.0/24 192.168.20.10"
ルーティングテーブルを確認します。
[root@router2 ~]# ip r
default via 192.168.122.1 dev eth0 proto static metric 100
192.168.10.0/24 via 192.168.20.10 dev eth1 proto static metric 101
192.168.20.0/24 dev eth1 proto kernel scope link src 192.168.20.20 metric 101
192.168.30.0/24 dev eth2 proto kernel scope link src 192.168.30.10 metric 102
192.168.122.0/24 dev eth0 proto kernel scope link src 192.168.122.25 metric 100
3.2.4 サーバ
ルーティングテーブルを設定します。
[root@server ~]# nmcli connection modify eth1 ipv4.routes "192.168.20.0/24 192.168.30.10" +ipv4.routes "192.168.10.0/24 192.168.30.10"
ルーティングテーブルを確認します。
[root@server ~]# ip r
default via 192.168.122.1 dev eth0 proto dhcp metric 100
192.168.10.0/24 via 192.168.30.10 dev eth1 proto static metric 101
192.168.20.0/24 via 192.168.30.10 dev eth1 proto static metric 101
192.168.30.0/24 dev eth1 proto kernel scope link src 192.168.30.20 metric 101
192.168.122.0/24 dev eth0 proto kernel scope link src 192.168.122.128 metric 100
3.3 firewalldの停止(暫定対処)
本来ならfirewalldは適切に設定して起動しておく必要があります。今回、firewalldにパケットフォワーディングの設定方法がわからなかったので、firewalldは停止しました。
[root@router1 ~]# systemctl stop firewalld.service
[root@router2 ~]# systemctl stop firewalld.service
3.4 疎通確認
クライアントからサーバまでの経路を確認するため、クライアントでtracerouteコマンドを実行します。実行結果を確認すると、ICMP echoパケットが、ルータ1、ルータ2、サーバの各eth1を通過していることがわかります。なお、tracerouteコマンドの使い方は、tracerouteコマンドの使い方 - hana_shinのLinux技術ブログを参照してください。
[root@client ~]# traceroute 192.168.30.20
traceroute to 192.168.30.20 (192.168.30.20), 30 hops max, 60 byte packets
 1  192.168.10.20 (192.168.10.20)  2.287 ms  2.993 ms  3.590 ms
 2  192.168.20.20 (192.168.20.20)  5.719 ms  5.676 ms  5.605 ms
 3  192.168.30.20 (192.168.30.20)  8.036 ms !X  8.187 ms !X  8.157 ms !X
次は、サーバからクライアンとまでの経路を確認するため、サーバでtracerouteコマンドを実行します。実行結果を確認すると、ICMP echoパケットが、ルータ2、ルータ1、クライアントの各eth2を通過していることがわかります。
root@server ~]# traceroute 192.168.10.10
traceroute to 192.168.10.10 (192.168.10.10), 30 hops max, 60 byte packets
 1  192.168.30.10 (192.168.30.10)  1.574 ms  1.542 ms  1.429 ms
 2  192.168.20.10 (192.168.20.10)  5.714 ms  6.102 ms  6.086 ms
 3  192.168.10.10 (192.168.10.10)  7.824 ms !X  7.603 ms !X  7.758 ms !X
4 libreswanのインストール
4.1 ルータ1
ルータ1にlibreswanパッケージをインストールします。
[root@router1 ~]# dnf -y install libreswan
ipsecの版数を確認します。
[root@router1 ~]# ipsec --version
Linux Libreswan 4.5 (XFRM) on 4.18.0-372.9.1.el8.x86_64
4.2 ルータ2
ルータ2にlibreswanパッケージをインストールします。
[root@router2 ~]# dnf -y install libreswan
ipsecの版数を確認します。
[root@router2 ~]# ipsec --version
Linux Libreswan 4.5 (XFRM) on 4.18.0-372.9.1.el8.x86_64
5 定義ファイルの編集
ここでは、認証方式としてPSK(Pre Shared Key)を使います。ルータ1とルータ2で同じキー(net1234567890)を設定します。キーの長さが短いとipsec verifyの実行結果でWarnigがでるので、ある程度の長さにします。そして、IPsecを実行するインタフェースのIPアドレスを設定します。
ルータ1でPSKの設定をします。
[root@router1 ~]# vi /etc/ipsec.d/net1.secrets
[root@router1 ~]# cat /etc/ipsec.d/net1.secrets
192.168.20.10 192.168.20.20 : PSK "net1234567890"
ルータ2でPSKの設定をします。
[root@router2 ~]# vi /etc/ipsec.d/net1.secrets
[root@router2 ~]# cat /etc/ipsec.d/net1.secrets
192.168.20.10 192.168.20.20 : PSK "net1234567890"
次に、ネットワーク1とネットワーク3でやりとりするパケットの暗号化に関する設定をします。
ルータ1で定義ファイルを編集します。
[root@router1 ~]# vi /etc/ipsec.d/net1.conf
[root@router1 ~]# cat /etc/ipsec.d/net1.conf
conn net1
     left=192.168.20.10
     leftsubnet=192.168.10.0/24
     right=192.168.20.20
     rightsubnet=192.168.30.0/24
     auto=start
     authby=secret
     dpddelay=10
     dpdtimeout=5
     dpdaction=restart
[root@router1 ~]#
ルータ2で定義ファイルを編集します。
[root@router2 ~]# vi /etc/ipsec.d/net1.conf
[root@router2 ~]# cat /etc/ipsec.d/net1.conf
conn net1
     left=192.168.20.20
     leftsubnet=192.168.30.0/24
     right=192.168.20.10
     rightsubnet=192.168.10.0/24
     auto=start
     authby=secret
     dpddelay=10
     dpdtimeout=5
     dpdaction=restart
6 定義ファイルの確認
定義ファイルの編集が終わったら、ipsec verifyを実行して正しい設定かどうかを確認します。OK以外の項目については、設定を変更してOKになるようにします。
私の環境では、 ipsec verify初回実行時、以下のような結果になりました。ルータ2でも同じように実行します。
[root@router1 ~]# ipsec verify
Verifying installed system and configuration files

Version check and ipsec on-path                         [OK]
Libreswan 4.5 (XFRM) on 4.18.0-372.9.1.el8.x86_64
Checking for IPsec support in kernel                    [OK]
 NETKEY: Testing XFRM related proc values
         ICMP default/send_redirects                    [NOT DISABLED]

  Disable /proc/sys/net/ipv4/conf/*/send_redirects or XFRM/NETKEY will act on or cause sending of bogus ICMP redirects!

         ICMP default/accept_redirects                  [NOT DISABLED]

  Disable /proc/sys/net/ipv4/conf/*/accept_redirects or XFRM/NETKEY will act on or cause sending of bogus ICMP redirects!

         XFRM larval drop                               [OK]
Pluto ipsec.conf syntax                                 [OK]
Checking rp_filter                                      [ENABLED]
 /proc/sys/net/ipv4/conf/all/rp_filter                  [ENABLED]
  rp_filter is not fully aware of IPsec and should be disabled
Checking that pluto is running                          [OK]
 Pluto listening for IKE on udp 500                     [OK]
 Pluto listening for IKE/NAT-T on udp 4500              [OK]
 Pluto ipsec.secret syntax                              [OBSOLETE]
  003 WARNING: using a weak secret (PSK)
Checking 'ip' command                                   [OK]
Checking 'iptables' command                             [OK]
Checking 'prelink' command does not interfere with FIPS [OK]
Checking for obsolete ipsec.conf options                [OK]

ipsec verify: encountered 5 errors - see 'man ipsec_verify' for help
ipsec verify初回実行結果より、"NOT DISABLED"、"ENABLED"を消すため、以下の設定をしました。ルータ2でも同じ設定をします。
[root@router1 ~]# vi /etc/sysctl.d/90-ipsec.conf
[root@router1 ~]# cat /etc/sysctl.d/90-ipsec.conf
net.ipv4.ip_forward = 1

net.ipv4.conf.all.arp_ignore = 1
net.ipv4.conf.default.arp_ignore = 1
net.ipv4.conf.eth0.arp_ignore = 1
net.ipv4.conf.eth1.arp_ignore = 1
net.ipv4.conf.eth2.arp_ignore = 1
net.ipv4.conf.lo.arp_ignore = 1

net.ipv4.conf.all.send_redirects = 0
net.ipv4.conf.default.send_redirects = 0
net.ipv4.conf.eth0.send_redirects = 0
net.ipv4.conf.eth1.send_redirects = 0
net.ipv4.conf.eth2.send_redirects = 0
net.ipv4.conf.lo.send_redirects = 0

net.ipv4.conf.all.accept_redirects = 0
net.ipv4.conf.default.accept_redirects = 0
net.ipv4.conf.eth0.accept_redirects = 0
net.ipv4.conf.eth1.accept_redirects = 0
net.ipv4.conf.eth2.accept_redirects = 0
net.ipv4.conf.lo.accept_redirects = 0

net.ipv4.conf.all.rp_filter = 0
net.ipv4.conf.default.rp_filter = 0
net.ipv4.conf.eth0.rp_filter = 0
net.ipv4.conf.eth1.rp_filter = 0
net.ipv4.conf.eth2.rp_filter = 0
net.ipv4.conf.lo.rp_filter = 0
システム起動時、ipsecサービスを起動するようにします。
[root@router1 ~]# systemctl enable ipsec.service
Created symlink /etc/systemd/system/multi-user.target.wants/ipsec.service → /usr/lib/systemd/system/ipsec.service.
システムを再起動します。
[root@router1 ~]# shutdown -r now
もう一度、ipsec verifyを実行します。今度は、"NOT DISABLED"、"ENABLED"が出力されなくなったことがわかります。
[root@router1 ~]# ipsec verify
Verifying installed system and configuration files

Version check and ipsec on-path                         [OK]
Libreswan 4.5 (XFRM) on 4.18.0-372.9.1.el8.x86_64
Checking for IPsec support in kernel                    [OK]
 NETKEY: Testing XFRM related proc values
         ICMP default/send_redirects                    [OK]
         ICMP default/accept_redirects                  [OK]
         XFRM larval drop                               [OK]
Pluto ipsec.conf syntax                                 [OK]
Checking rp_filter                                      [OK]
Checking that pluto is running                          [OK]
 Pluto listening for IKE on udp 500                     [OK]
 Pluto listening for IKE/NAT-T on udp 4500              [OK]
 Pluto ipsec.secret syntax                              [OK]
Checking 'ip' command                                   [OK]
Checking 'iptables' command                             [OK]
Checking 'prelink' command does not interfere with FIPS [OK]
Checking for obsolete ipsec.conf options                [OK]
7 動作確認
7.1 SA確立時の確認
ルータ2でtcpdumpを実行します。
[root@router2 ~]# tcpdump -i eth1 udp -w ipsec.pcap
ルータ2でipsecサービスを起動します。
[root@router2 ~]# systemctl start ipsec.service
ルータ1でipsecサービスを起動します。
[root@router1 ~]# systemctl start ipsec.service
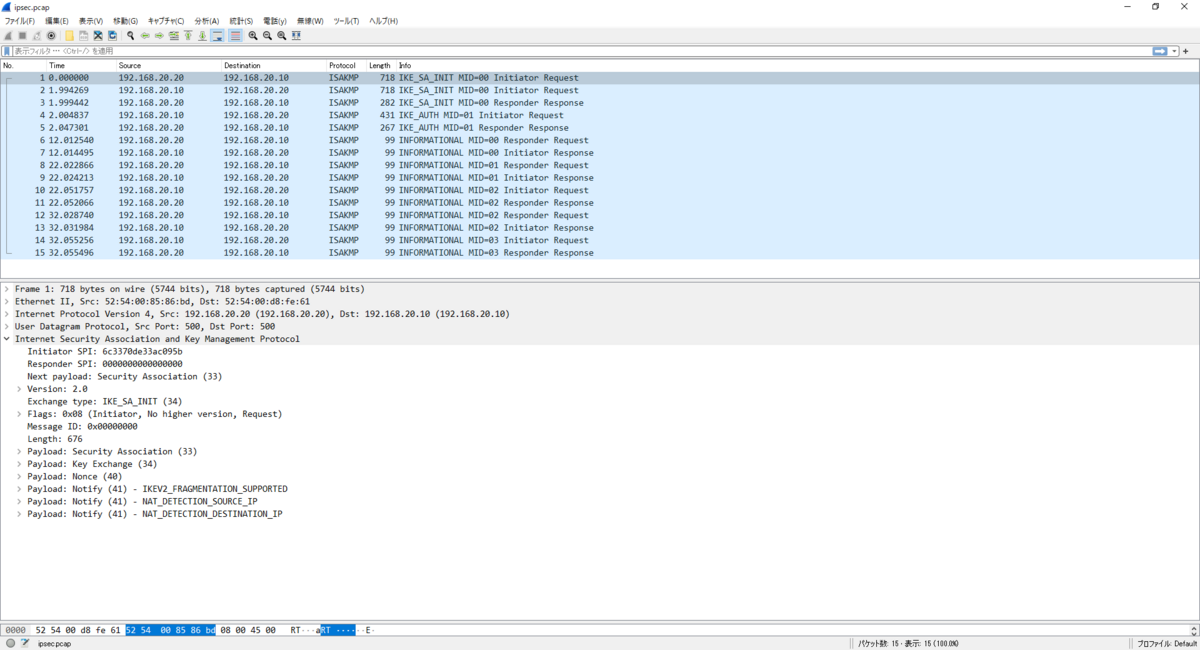
採取したパケットキャプチャをWiresharkで確認してみます。
7.2 ESPパケットの確認
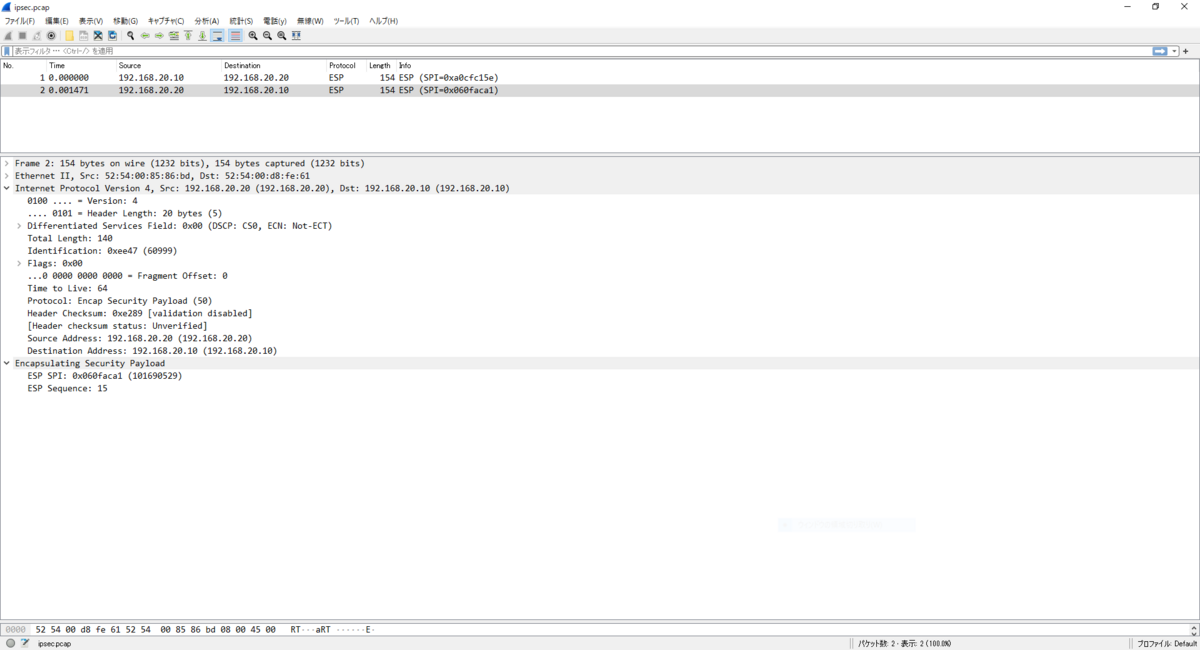
クライアントでpingコマンドを実行します。このとき、ルータ2でtcpdumpを実行して、eth1を通過するパケットをキャプチャします。
[root@router2 ~]# tcpdump -i eth1 esp -w ipsec.pcap
クライアントでpingコマンドを実行します。
[root@client ~]# ping -c 1 192.168.30.20
採取したパケットキャプチャをWiresharkで確認してみます。ルータ1とルータ2でやり取りするICMPパケットが暗号化(ESPパケット)されていることがわかります。
7.3 IPコマンドによる状態確認
ルータ1でipコマンドを実行します。
[root@router1 ~]# ip xfrm state
src 192.168.20.20 dst 192.168.20.10
        proto esp spi 0x7b75581b reqid 16389 mode tunnel
        replay-window 32 flag af-unspec
        aead rfc4106(gcm(aes)) 0xa712906564676dfa1fff68bc6919def1649a81ba3a8f74cecdbb1502c4b103868d86581a 128
        anti-replay context: seq 0x0, oseq 0x0, bitmap 0x00000000
src 192.168.20.10 dst 192.168.20.20
        proto esp spi 0x5421fd5b reqid 16389 mode tunnel
        replay-window 32 flag af-unspec
        aead rfc4106(gcm(aes)) 0x3fe1298c0a53a5b360b0d87f7edf5856194dd0b5538293f50cd13f30c5f1c50d3441672d 128
        anti-replay context: seq 0x0, oseq 0x0, bitmap 0x00000000
ESPパケットの送受信をモニタします。
[root@router1 ~]# ip xfrm monitor
クライアントでpingコマンドを実行します。
[root@client ~]# ping -c 1 192.168.30.20
ipコマンドの実行結果を確認すると、ルータ1とルータ2の間でESPパケットを送受信していることがわかります。
[root@router1 ~]# ip xfrm monitor
Async event  (0x20)  timer expired
        src 192.168.20.10 dst 192.168.20.20  reqid 0x4005 protocol esp  SPI 0xa0b34ad7
Async event  (0x20)  timer expired
        src 192.168.20.20 dst 192.168.20.10  reqid 0x4005 protocol esp  SPI 0xfb5189e4
8 その他
ipsecサービスを起動するとplutoが動き出します。plutoは鍵交換を行うプロセスです。ルータ1とルータ2のplutoが定期的に鍵を交換します。ここでは、ルータ1でpsコマンドを実行してplutoの状態を確認します。
[root@router1 ~]# ps -C pluto -o comm,pid,ppid,args
COMMAND             PID    PPID COMMAND
pluto              1804       1 /usr/libexec/ipsec/pluto --leak-detective --config /etc/ipsec.conf --nofork
Z 参考情報
私が業務や記事執筆で参考にした書籍を以下のページに記載します。
Linux技術のスキルアップをしよう! - hana_shinのLinux技術ブログ